-
منوی اصلیبستن
-
Dental
-
-
-
Gloves
-
-
-
Gloves
-
-
-
Gloves
-
-
-
Gloves
-
-
-
Dental Finishing & Polishing
-
-
-
Gloves
-
-
-
Gloves
-
-
-
Gloves
-
-
-
Gloves
-
-
-
Gloves
-
-
-
Gloves
-
-
-
-
Gloves
-
-
-
Gloves
-
-
-
Gloves
-
-
-
-
-
Gloves
-
-
-
Gloves
-
-
-
Gloves
-
-
-
Gloves
-
-
-
Gloves
-
-
-
Gloves
-
-
-
Gloves
-
-
-
- Dandal Service
- Dandal Yar
- Mag
- Help
-
Corporate
-
- Login/ Register
-
منوی اصلیبستن
-
Dental
-
-
-
Gloves
-
-
-
Gloves
-
-
-
Gloves
-
-
-
Gloves
-
-
-
Dental Finishing & Polishing
-
-
-
Gloves
-
-
-
Gloves
-
-
-
Gloves
-
-
-
Gloves
-
-
-
Gloves
-
-
-
Gloves
-
-
-
-
Gloves
-
-
-
Gloves
-
-
-
Gloves
-
-
-
-
-
Gloves
-
-
-
Gloves
-
-
-
Gloves
-
-
-
Gloves
-
-
-
Gloves
-
-
-
Gloves
-
-
-
Gloves
-
-
-
- Dandal Service
- Dandal Yar
- Mag
- Help
-
Corporate
-
- Login/ Register
- Home
- Dental Online Shop - Distributor & Supplier
- Dental Equipment & Accessories
- Endodontic Equipment
- Apex Locator
- Morita - Root ZX Mini Apex Locator
Morita - Root ZX Mini Apex Locator - Dandal Color - Equipment H White
-
In line with the demand of Dandal site customers for credit purchases, Dandal in cooperation with Saman Bank has provided a new service for dental and medical offices and treatment centers, which customers can use a credit card from the site at any time without any cash support.
- More Info


Morita - Root ZX Mini Apex Locator
Pay in installments
Choose your plan:
Current plan: 3Month
Description: 30+3
Down payment: تومان20,350,000 (25.00%)
Number of payments: 3
Tax:
Amount of payment: تومان21,164,000
Overpayment: تومان2,442,000
Total: تومان83,842,000
Down payment: تومان8,030,000 (25.00%)
Number of payments: 3
Tax:
Amount of payment: تومان8,351,200
Overpayment: تومان963,600
Total: تومان33,083,600
Down payment: تومان8,030,000 (25.00%)
Number of payments: 3
Tax:
Amount of payment: تومان8,351,200
Overpayment: تومان963,600
Total: تومان33,083,600
Down payment: تومان8,030,000 (25.00%)
Number of payments: 3
Tax:
Amount of payment: تومان8,351,200
Overpayment: تومان963,600
Total: تومان33,083,600
Current plan: Cash
Description: نقدی
Down payment: تومان0 (0.00%)
Number of payments: 1
Tax:
Amount of payment: تومان81,400,000
Overpayment: تومان0
Total: تومان81,400,000
Down payment: تومان0 (0.00%)
Number of payments: 1
Tax:
Amount of payment: تومان32,120,000
Overpayment: تومان0
Total: تومان32,120,000
Down payment: تومان0 (0.00%)
Number of payments: 1
Tax:
Amount of payment: تومان32,120,000
Overpayment: تومان0
Total: تومان32,120,000
Down payment: تومان0 (0.00%)
Number of payments: 1
Tax:
Amount of payment: تومان32,120,000
Overpayment: تومان0
Total: تومان32,120,000

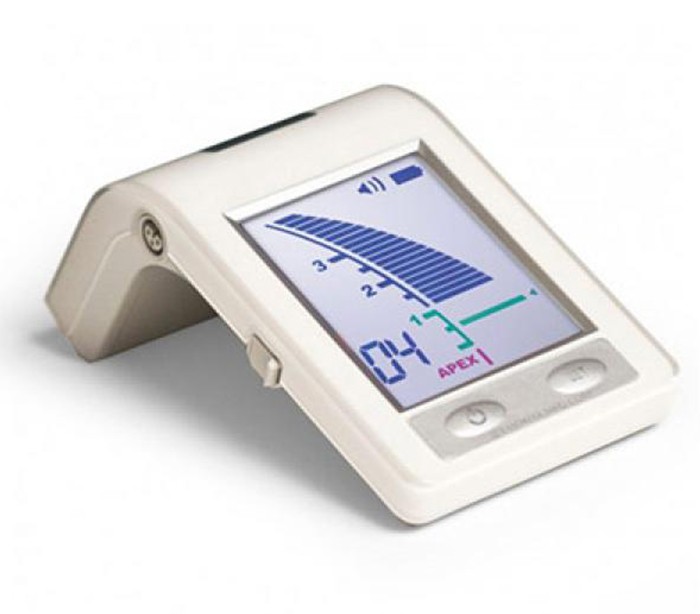
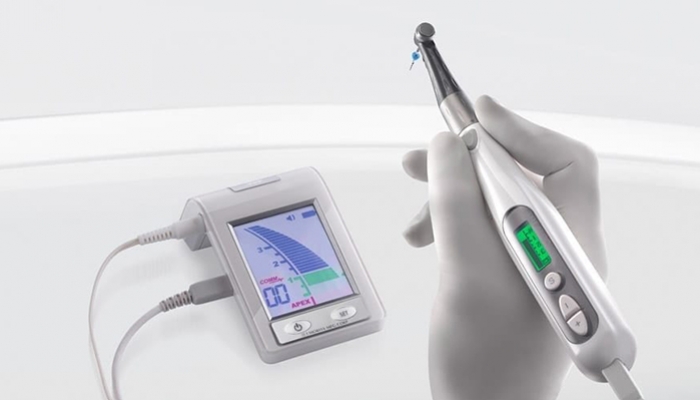
Root ZX mini is compact, lightweight, and portable. It can be placed on the tray or any other convenient place.

+ Advantages:
- Accurate measurement
- No zero adjustment
- Automatic calibration
- Large colour LCD display
- Memory bar with 3 programms
- 4 colours available

Accurate Measurement
Utilizing the ratio technique, Root ZX mini provides a highly accurate indication of the file’s location. The accuracy of the measurement is not affected by the presence or absence of blood, other discharges, electrolytes, saline, tap water, or hydrogen peroxide.
No Zero Adjustment
It is not necessary to set the device on zero before measuring each individual canal.
Automatic Calibration
Automatic calibration ensures accuracy and eliminates the effect of changes in temperature, moisture, etc. inside the canal, even during treatment.
Automatic calibration allows the machine to make adjustments based on conditions like the moisture, temperature and more of the root canal.
Compact and Lightweight Design
Root ZX mini measures just over 4“ x 2⅓” and weighs 3.88 ounces. Its compact size and stable design allow for excellent flexibility during procedures. It can be placed on the tray or any other convenient location for the clinician.

The color liquid crystal display is easy to read, providing a clear progressive display and high contrast. The positions of the Flash Bar and the Memory Bar can be set as guides for canal measurement and enlargement.
1 – Flash Bar
The reference point for measurement or enlargement can be set anywhere between 2 and APEX.
2 – Memory Bar
It can be used to mark the beginning of a sharp curve or some certain distance from the apex. It can also be used as a guide when the file size is changed for canal enlargement. The memory bar can be set only by the measurement state.
3 – Information Display
Number of bars left before flash bar is reached (during measurement). Memory number for flash bar (without measurement).
4 – Liquid Crystal Display
5 – Canal Length Indicator Bars
6 – Sound Volume (off, low, high)
7 – Battery Power Indicator

How to Use:
1. The meter is activated when the file is inserted into a root canal. The number of bars remaining before the file reaches the flash bar is shown in the lower left corner of the display.
2. When the file tip reaches a position near the apex, the bar color changes to green to indicate you have reached a critical area.
3. When the file tip reaches the preset position of the flash bar, the flash bar stops blinking and stays on.
4. When the file tip passes the apex, the “APEX” and “t” indicators start blinking.
Unit Includes:
1× probe cord
3× file holders
5× contrary electrodes
1× canal-length tester
3x 1.5 VDC AAA size battery

Product Details
Data sheet
- Company/ Brand
- Morita
- Country
- Japan
- Charge Level Indicator
- Yes
- Weight
- Approx. 110gr
بیشتر
Data sheet
- Company/ Brand
- Morita
- Country
- Japan
- Charge Level Indicator
- Yes
- Weight
- Approx. 110gr

Data sheet
- Morita
- Japan
- Yes
- Approx. 110gr
- 57mm | 103mm | 60mm
- 3 Alkali Battery AA
- Coloured LCD
- Unknown
- Yes
- 97.5%
- No
- Yes
Specific References
- 003400
- C6G2
Related Products By Category


Leave a comment about this product
کیفیت مناسب
دستگاه خوبیه اما حساسیتش بالاس و باید محیط کاملا خشک و تمیز شده باشه من مدل root zx دارم و به نظرم کیفیت نتیجش تحت تاثیر محیط هست اما از انتخابم واقعا راضی ام.
جز بهترین اپکس هاست
من این اپکس رو خریدم و خیلی راضیم ولی اگر کلینیک های مختلف نمیرید و جابه جایی زیاد ندارید پیشنهادم اینه مدل غیر مینی رو بردارید اگر میخواهید یک اپکس همراه شما باشه حتما این مدل رو بردارید فکر میکنم تو ایران بهترینه